Cambio dell'olio (filtro compreso)
Una buona occasione per cambiare l'olio è data dall'ultima escursione di fine stagione: fuori la melmetta e pronta la motina, fresca e curata, per il letargo invernale. Ma anche come un 'svegliati bellezza' primaverile l'olio nuovo è perfetto.
Chi invece non conosce stagioni perché sempre in sella sulla due ruote, il quando dell'intervallo fra un cambio olio e l'altro lo prende dal manuale – utile anche per individuare la giusta quantità e la viscosità corretta.
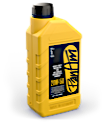
Una cosa: se qualcuno o qualcuna dovesse notare che qui compare sorprendentemente spesso il nome PanAm: è perché PanAm è la nostra marca d'olio, testata lungo migliaia di miglia con i più diversi ferri Milwaukee e giudicata ottima.
Dato che sappiamo quanto può essere sudicio e snervante un cambio dell'olio, abbiamo dotato la nostra gamma prodotti di parecchie cose capaci di rendere questi momenti unti un po' più confortevoli e più puliti – anche usando olio di altre marche ;-) La cosa migliore sarà quindi darci uno sguardo prima di svitare il tappo di scarico:


1) Ordinare l'olio.
La scelta è vasta, 20W 50 è standard classico, ma dipende da cosa è capace e cosa dovrà essere capace di fare la motina. Per la corretta viscosità uno sguardo al manuale può essere d'aiuto – o anche una chiacchierata con i nostri eroi del commerciale, scrivendo a service@wwag.com o chiamando il +49 931 250 61 16.
E già che ci siete, alla stessa occasione conviene anche:
2) Ordinare la nuova guarnizione per il tappo
di scarico dell'olio (specifica per modello)
E visto che il bell'olio nuovo è bene che non passi attraverso dei vecchi stracci:
3) Conviene ordinarci insieme anche il filtro dell'olio.
Anche qui è meglio guardar bene: modello e anno di costruzione – a meno che non sia già tutto custom. Comunque, se avete dubbi, chiamate sempre la nostra hotline +49 931 250 61 16 o mandate una mail (magari allegandoci una foto del serbatoio olio!) indirizzata a sales@wwag.com.
3a.) Per non dimenticare i piccoli ausili pratici,
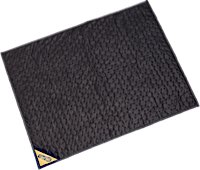
continuate a leggere e completate la lista della spesa ;-) È sconfortante rendersi p.es. conto che un tappetino assorbente per l'olio SAREBBE stato davvero pratico, quando all'improvviso la macchiaccia s'allarga sul pavimento del garage.
Perché il pacco arrivi, non ci dovrebbe volere moltissimo. E una volta che c'è, i dadi son tratti:
4) Riscaldare bene il motore
della moto facendoci una corsa. Meglio se di almeno 50 chilometri tutti di fila, affinché l'olio bollente possa smuovere e portare con sé il più possibile dei depositi formatisi nel circuito.
5) Spingere il motociclo così riscaldato
direttamente nel garage o nell'officina. Beato colui che a quel punto risulta ben attrezzato: piazzerà sotto la moto il suo tappetino assorbente .
6) Piegare secondo necessità
il PanAm Oil Slide e sistemarlo sotto il tappo di scarico, in modo che l'olio possa scorrere senza intoppi dal serbatoio al contenitore di raccolta.
7) Svitare il tappo di scarico dal serbatoio dell'olio.
(Chi ha un tappo magnetico dovrebbe riuscire a vedere se ci sono molti frammenti ferrosi – senz'altro un segnale d'allarme.)
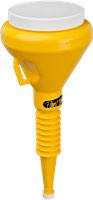
Mentre l'olio caldo continua a defluire, preparate l'imbuto e aprite la tanica dell'olio nuovo.
8) Non lavate il serbatoio dell'olio.
Se il macinino era veramente bollente quando avete spurgato, allora il grosso dello sporco è già uscito, e qualche goccia di olio vecchio che rimane non è un problema. Tanto le incrostazioni rimarrebbero comunque – mentre chi cerca di “far pulizia” con dei solventi mette solo a rischio in modo duraturo la funzione lubrificante dell'olio nuovo.
9) Pulire il tappo di scarico
e riavvitarlo con una nuova guarnizione al serbatoio dell'olio, stringendo con accortezza.
10) Introdurre con buona mira
e in pulizia l'olio nuovo nel serbatoio olio (un imbuto può essere d'aiuto, il primo getto a volte non coglie nel segno. Il manuale comunque dice quanto olio ci deve andare – o anche i nostri TechTipps (vedi sotto).
Bene, passiamo al filtro olio – e anche qui non si sbaglia usando un tappetino assorbente.
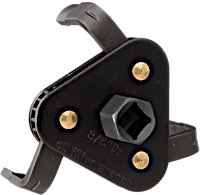
11) Svitare il vecchio filtro dell'olio.
Se s'impunta, può essere utile p.es. la chiave per filtri, universale e autoregolante, 93-967.
12) Spalmare dell'olio
sulla guarnizione del filtro nuovo, inserire con cautela il filtro e stringere a mano senza usare attrezzi.
13) Non sarebbe forse il caso
di far fare dei giri al motore a moto ferma, oppure di farci un giro intorno all'isolato, per vedere se tutto è stagno e se l'olio va in pressione?
14) Smaltire correttamente l'olio vecchio
e il filtro usato. Certamente internet vi aiuterà a trovare l'indirizzo giusto nelle vicinanze.
Bingo. Tutto pronto per correre lisci come l'olio.